Congratulations on acquiring your new Philips kettle! In these instructions for
use you will find all important information, so you can optimally enjoy your
kettle as long as possible.
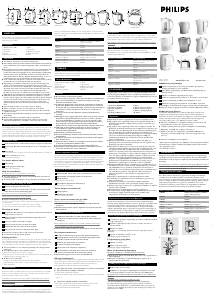
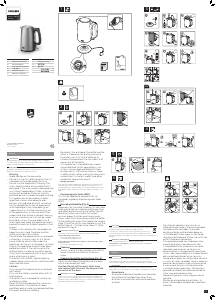
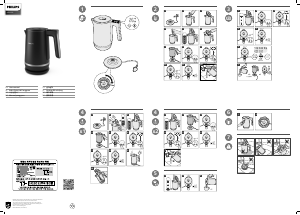
Description
1) On/Off switch (I/O) 6) Base
2) Pilot lamp 7) Scale filter
3) Safety lid 8) Double-action filter
4) Spout 9) Triple-action filter
5) Water-level indicator 10) Filter
Important
◗ This kettle is only meant to be used for boiling water.
◗ Never fill the kettle beyond the maximum level indication. If the kettle has
been overfilled, there is a risk that boiling water will be ejected from the
spout.
◗ Never fill the kettle below the minimum level. In case of kettles with a flat
heating element: never put less than 0.1 litre of water in the kettle to
prevent the kettle from boiling dry. In case of kettles with a spiral heating
element: never put less than 0.4 litre of water in the kettle, unless the
water-level indicator indicates a different minimal water-level . In case of
metal kettles: never put less than 0.2 litre of water in the kettle.
◗ Some condensation may appear on the base of the kettle.This is perfectly
normal and does not mean that the kettle has any defects.
◗ Depending on the hardness of the water in your area, small spots may
appear on the heating element of your kettle when you use it.This
phenomenon is the result of scale build-up on the heating element and on
the inside of the kettle over time.The harder the water, the faster scale
will build up. Scale can occur in different colours.Although scale is
harmless, too much scale can influence the performance of your kettle.
Please follow the instructions for descaling the kettle given in this leaflet.
◗ 3100 watts kettle:This Philips rapid boil kettle can draw up to 13 amps
from the power supply in your home. Make sure that the electrical system
in your home and the circuit to which the kettle is connected can cope
with this level of power consumption. Do not let too many other
appliances draw power from the same circuit while the kettle is being
used.
◗ Keep the kettle and the cord out of the reach of children.
◗ Excess cord can be stored in or around the base of the kettle.
◗ Boiling water can cause serious burns. Please take care when the kettle
contains hot water.
◗ Directly removing the lid after brewing can cause hot steam coming out
of the kettle.
◗ Only use the kettle in combination with its original base.
◗ If your kettle is damaged in any way, please contact a service centre
authorised by Philips. Do not attempt to make any repairs yourself.
Boil-dry protection
The heating element of your kettle is protected by a safety cut-out device.This
device will automatically switch the kettle off if it is accidentally switched on
without any water or with insufficient water.The on/off switch will stay in the 'I'
position and the pilot light, if available, will stay on. Please switch the kettle off
and wait 10 minutes for the kettle to cool down.Then lift the kettle from its
base to reset the boil-dry protection.The kettle is ready for use again.
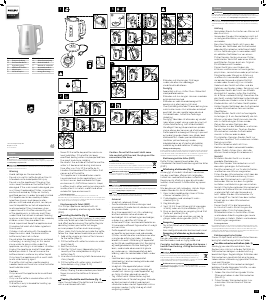
Using the kettle
1
Place the kettle base on a flat surface and put the plug in the wall socket.
2
Fill the kettle with water either through the spout or through the open
lid
3
Close the lid.
Make sure that the lid is properly closed to prevent the kettle from boiling dry.
4
Set the on/off switch to on (1)
The kettle starts heating up.
For kettles without a base
1
Close the lid.
2
Put the plug in the wall socket
The kettle starts heating up.
Only for metal kettles
Be careful, the body of a metal kettle becomes
hot!
◗
The kettle switches off ('O' position) automatically when the water has
reached boiling point.
◗ You can interrupt the boiling process by setting the on/off switch to 'O'.
Cleaning and descaling the kettle
1
Remove the plug from the wall socket.
2
Clean the outside of the kettle with a soft, damp cloth moistened with
warm water and some mild cleaning agent.
Do not use any abrasive cleaning agents, scourers etc. to clean the kettle.
Never immerse the kettle or its base in water.
◗ Regular descaling will prolong the life of the kettle.
In case of normal use (up to 5 times a day), the following descaling frequency is
recommended:
1) once every 3 months for soft water areas (up to 18 dH)
2) once every month for hard water areas (more than 18 dH)
Descaling the kettle
1 Fill the kettle with water up to three-quarters of the maximum level and
bring the water to the boil.
2
After the kettle has switched off, add white vinegar (8%) to the
maximum level.
3
Leave the solution in the kettle overnight.
4
Empty the kettle and rinse the inside thoroughly.
5
Fill the kettle with clean water and boil the water.
6
Empty the kettle and rinse it with clean water again.
◗ Repeat the procedure if there is still some scale in the kettle.
◗ You can also use an appropriate descaler.
Cleaning the filter
Scale is not harmful to your health but it may give your drink a powdery taste.
The scale filter prevents scale particles from ending up in your drink. Models
with a double-action filter and triple-action filter have also been equipped with
a mesh that attracts scale from the water. Clean the scale filter regularly.
◗ The mesh of filters is to be cleaned by squeezing and rotating it under a
running tap.
◗ The triple-action filter can be cleaned as follows:
1) Remove the basket from the filter by sliding it.
2) Take the stainless steel mesh out of the basket and clean it by squeezing and
rotating it under a running tap (fig. 1-3).
◗ All filters can be cleaned by:
- leaving it in the kettle during descaling the whole appliance
- gently brushing the filter with a soft nylon brush under a running tab
- in the dishwasher.
Replacement
Replacement filters for Philips kettles can only be purchased from your Philips
dealer or your local Philips service centre.The table below indicates which
filters are suitable for which type of kettle.
If the kettle or the mains cord of the appliance is
damaged, it may only be
replaced by a service centre authorised by Philips, as special tools and/or
parts are required.
Information and service
If you need information or if you have a problem, please visit the Philips Web
site at www.philips.com or contact the Philips Customer Care Centre in your
country (you will find its phone number in the world-wide guarantee leaflet). If
ENGLISH
www.philips.com
u
4222 001 94765
TÜRKÇE
Yeni Philips Su Isıtıcısını denemeye başlamışsınız.Tebrikler! Kullanma kılavuzunda
cihazın kullanımı ile ilgili tüm gerekli bilgilere ulaşarak cihazı son derece kolay
kullanma şansına erişerek zevk alacaksınız.
Genel Açıklamalar
1) Açma/kapama düğmesi (I/O) 6) Taban
2) Pilot ışık 7) Kireç filtresi
3)Güvenlik kapagi 8) Double-action filtre
4) Agiz bölümü 9) Triple-action filtre
5) Su seviye göstergesi 10) Filtre
Önemli
◗ Bu cihaz sadece su kaynatmaya uygundur.
◗ Su ısıtıcısını Max. göstergesinin seviyesinden daha fazla su ile doldurmayınız.
Eğer su ısıtıcı fazla miktarda su ile doldurulursa kaynayan suyun ağız
kısmından taşma ihtimali olabilir.
◗ Su ısıtıcısının içinde bulunan suyun minimum seviyesinden az olmamasına
dikkat ediniz. Özellikle düz resistanslı ısıtma birimi bulunan su ısıtıcılarına
0,1 litreden daha az su doldurmayınız.Eğer ısıtma birimi spiral resistanslı ise
en az 0.4 litre su doldurunuz. Metal su ısıtıcılarına ise en az 0.2 litre su
doldurunuz.
◗ Su ısıtıcının taban kısmında buğulaşama meydana gelebilir. Bu durum
normaldir.
◗ Kullandığınız suyun sertliğine bağlı olarak, cihazın ısıtma devreleri üzerinde
küçük lekeler oluşabilir. Zamanla ısıtma devreleri ve cihazın iç kısmında
kireç oluşur. Kullandığınız su ne kadar sert ise kirecin oluşması o kadar
çabuk olur. Kireçin rengi değişebilir. Kireç zararsız olduğu halde, biriken
kireç cihazınızın performasını etkileyecektir. Bu yüzden kullanma
kılavuzunda kireç temizlenmesi ile ilgili açıklamaları okuyarak tatbik ediniz.
◗ 3100 wattli su isiticisi: Philips'in çabuk isinan su isiticisi 13 amper güç
harcamaktadir. Bu yüzden cihazi kullandigini prizde ayni anda diger
elektrikli cihazlari kullanmayiniz.
◗ Cihazın fişini çocuklardan uzak tutunuz.
◗ Kordonun kullanılmayan bölümünü taban bölümünün alt kısmına sararak
saklayabilirsiniz.
◗ Su ısıtıcının içinde sıcak su bulunduğunda yanma tehlikesi olabileceğinden
lütfen dikkatli olunuz.
◗ Cihazin içindeki su isindiktan sonra kapagini ani açarsaniz yanma tehlikesi
ile karsi karsiya kalabilirsiniz. Dikkatli olunuz.
◗ Su ısıtma cihazını yalnızca kendine ait orijinal tabanı ile kullanınız.
◗ Herhangi bir sekilde cihaziniz hasar görmüsse, yetkili Philips servislerine
basvurunuz. Kendiniz tamir etmeye çalismayiniz.
Susuz çalışmama emniyeti
Su ısıtıcınızın ısıtma elementleri elektrik kesme emniyetine ile korunuyorsa, su
ısıtıcısının içinde yetersiz su kaldığında veya içindeki su tükendiğinde bu sistem
devreye girerek cihazı otomatik olarak kapatacaktır. Açma/kapama düğmesi 'I'
pozisyonunda ve eğer pilot ışık varsa açık pozisyonda kalacaktır. Cihazı kapatınız
ve su ısıtıcısının soğuması için 10 dakika bekleyiniz. Daha sonra su ısıtıcısının
tabanında kaldırarak "Susuz çalışmama emniyetini" tekrar aktif hale getiriniz. Su
ısıtıcısı kullanıma hazırdır.
Su Isıtma Cihazının Kullanılması
1 Cihazin tabanini düz bir zemin üzerine yerlestiriniz. Fisini prize takiniz.
2 Agiz kismindan veya kapagini açarak su ile doldurunuz.
3 Kapağı kapatınız.
Kapagini dogru olarak kapatiniz.
4 Açam/kapama dügmesinden cihazi açiniz.(1)
Su ısıtıcı ısınmaya başlayacaktır.
Tabanı olmayan su ısıtıcıları için
1 Kapağı kapatınız.
2 Cihazin fisini prize takiniz.
Su ısıtıcı ısınmaya başlayacaktır.
Sadece metal su ısıtıcıları için geçerlidir.
Dikkat!! Metal su ısıtıcısının gövde kısmı ısınabilir!!
◗ Su ısıtıcısı içindeki su kaynadığında otomatik olarak kapanacaktır.('0'
pozisyonu)
◗ Kaynatma işlemini açama / kapama düğmesini '0' pozisyonuna getirerek
durdurabilirsiniz.
Cihazın ve kirecin temizlenmesi
1 Temizlemeye başlamadan önce taban ünitesini fişten çıkarınız.
2 Su isiticisinin dis yüzünü yumusak, sabunlu ilik bir bezle temizleyerek
temizleyiniz.
Cihazı temizlemek için aşındırıcı ve çizici temizlik maddeleri kullanmayınız.
Isıtıcıyı veya tabanı asla suyun içine batırmayınız.
◗ Kirecin düzenli olarak temizlenmesi cihazın kullanım ömrünü uzatacaktır.
Kireç taşının temizlenmesi
1 Su ısıtıcısını maksimum göstergesine kadar doldurarak kaynatınız.
2 Cihazı kapatıktan sonra ısıtıcının içerisinde Max.göstergesine kadar
dodurulan suya %8 oranında beyaz sirke ekleyini
3 Cihazı bir gece içinde sirkeli su ile bırakınız.
4 Su ısıtıcısını boşaltıp içini durulayınız.
5 Isıtıcıyı temiz su ile doldurunuz ve kaynatınız.
6 Isıtıcıyı boşaltınız ve durulayıp tekrar temiz su ile doldurunuz.
◗ Bu işlemi su ısıtıcısında halen kireç varsa devam ettiriniz.
◗ Aynı zamanda uygun bir kireç çözücü de kullanabilirsiniz.
Filtrenin temizlenmesi
Kireç sagliga zararli degildir. Fakat içeceginizin tadini bozabilir. Kireç filtresi cihazin
içinde olusan kireç tortularinin içeceginize karismasini önler. Double action ve
Triple action filtre bulunan su isiticilarinda sudan kireci ayirabilien ag
bulunmaktadir. Kireç filtresini düzenli olarak temizleyiniz.
◗ Filtre ağları akan musluk suyu altında sıkılarak ve çevrilerek temizlenebilir.
◗ Triple action filtreni temizligi su sekildedir:
1) Sepeti filtreden kaydirarak çikartiniz..
2) Paslanmaz çelik filtre agini sepetten çikartiniz ve musluk suyu altinda yikayiniz
(şek. 1-3).
◗ Tüm filtreler aşağıdaki şekillerde temizlenebilir:
- Tüm filtreler cihazın içinde bırakarak kireç temizleme işlemi sırasında
- naylon fırça yardımı ile muslukta yıkayarak temizleyebilir
- veya bulaşık makinasında yıkayabilirsiniz.
Degistirme
Cihazın filtreleri sadece orjinal Philips filtreleri ile dğiştirilmeli ve sadece yetkili
Philips bayilerinden ve servislerinden temin edilmelidir. Aşağıdaki tablodan hangi
model filtrenin hangi model su ısıtıcısı için uygun olduğunu bulabilirsiniz.
Eger cihazin kordonu hasar görürse, degistirmek için yetkili Philips servislerine
basvurunuz.
Bilgi ve servis
Eğer bir probleminiz olursa, Philips web sayfasını ziyaret ederek
(www.philips.com.tr ) veya Philips Tüketici Danışma Hattını (0800 261 33 02)
arayarak yardım alabilirsiniz.
Philips!
,
.
1) On/Off (I/O) 6)
2) 7)
3) 8)
4) 9)
5) 10)
◗ .
◗ .
,
.
◗ .
:
0,1
. :
0,4 ,
.
: 0,2
.
◗
.
.
◗ ,
.
. ,
.
.
,
.
.
◗ 3100 watt: Philips
13 amps
.
.
.
◗ .
◗
.
◗ .
.
◗
.
◗ .
◗ ,
Philips.
.
.
. On/off
'' , ,
. 10
.
. .
1
.
2
3 .
.
4 on/off on (1)
.
1 .
2
.
, , !
◗ ( '')
.
◗
On/off ''.
1 .
2
.
.
.
.
w .
( 5 ),
: 1) 3
( 18dH)\par 2)
( 18dH)
1
.
2 , (8%)
.
3 .
4 .
5 .
6 .
◗ .
◗ .
.
.
. .
◗
.
◗ :
1) .
2)
(. 1-3).
◗ :
- .
-
.
- .
Philips Philips Philips.
.
,
Philips,
.
,
Philips www.philips.com
Philips (
).
,
Philips
BV Philips.


Tham gia cuộc trò chuyện về sản phẩm này
Tại đây bạn có thể chia sẻ suy nghĩ của mình về Philips HD4672 Ấm đun nước. Nếu bạn có thắc mắc, trước tiên hãy đọc kỹ hướng dẫn. Yêu cầu một hướng dẫn có thể được thực hiện bằng cách sử dụng mẫu liên hệ của chúng tôi.