A.1.1_5613-17701-222
Low battery / Batterie faible / Geringer Akkustand / Batteria scarica / Batería baja / Laag batterijvermogen / Bateria fraca /
Низкий заряд аккумулятора/Низький заряд батареї
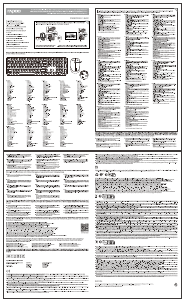
Switching among paired devices/Basculer parmi les appareils appairés/Zwischen gekoppelten Geräten umschalten/Commutazione tra dispositivi associati/
Cambio entre dispositivos emparejados/Schakelen tussen gekoppelde apparaten/Alternando entre dispositivos emparelhados/
Переключение между сопряженными устройствами/Перемикання м ж по днаних у пару пристро в
We, the manufacturer
Shenzhen Rapoo Technology Co., Ltd.
Fax: +86-0755-2858 8555
Declare that the product
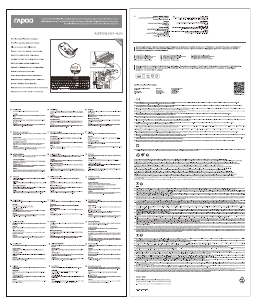
Product Name :Multi-mode Wireless Keyboard & Mouse
Model No :9000M(E6050M+M100)
Complies with the following norms of :
Kai Guo, Manager
R&D Department Date of Issue: Aug.
30, 2017
Declaration of Conformity
Manufacturer/Authorised representative
EN 62479:2010
EN 50663:2017
EN 60950-1:2006+A11:2009+A1:2010+A12:2011+A2:2013
The product is in compliance with the essential requirements of Radio
Equipment Directive 2014/53/EU,and the RoHS Directive 2011/65/EU.
It is forbidden to reproduce any part of this quick start guide without the permission of Shenzhen Rapoo Technology Co., Ltd.
FCC Statement
This equipment has been tested and found to comply with the limits for a Class B digital device, pursuant to part 15 of the FCC rules. These limits are designed to provide reasonable protection against harmful interference
in a residential installation. This equipment generates, uses and can radiate radio frequency energy and, if not installed and used in accordance with the instructions, may cause harmful interference to radio
communications. However, there is no guarantee that interference will not occur in a particular installation. If this equipment does cause harmful interference
to radio or television reception, which can be determined by turning the equipment off and on, the user is encouraged to try to correct the interference by one or more of the following measures:
-Reorient or relocate the receiving antenna.
-Increase the separation between the equipment and receiver.
-Connect the equipment into an outlet on a circuit different from that to which the receiver is connected.
-Consult the dealer or an experienced radio/TV technician for help.
To assure continued compliance, any changes or modifications not expressly approved by the party responsible for compliance could void the user’s authority to operate this equipment. (Example- use only shielded
interface cables when connecting to computer or peripheral devices).
FCC Radiation Exposure Statement
This equipment complies with FCC RF radiation exposure limits set forth for an uncontrolled environment. This transmitter must not be co-located or operating in conjunction with any other antenna or transmitter.
This equipment complies with Part 15 of the FCC Rules.Operation is subject to the following two conditions:
(1) This device may not cause harmful interference, and
(2) This device must accept any interference received, including interference that may cause undesired operation.
Caution!
The manufacturer is not responsible for any radio or TV interference caused by unauthorized modifications to this equipment. Such modifications could void the user authority to operate the equipment.
ISEDC RSS warning
This device complies with Industry Canada licence-exempt RSS standard (s). Operation is subject to the following two conditions:
(1) this device may not cause interference, and
(2) this device must accept any interference,including interference that may cause undesired operation of the device.
Le présent appareil est conforme aux CNR d'Industrie Canada applicables aux appareils radio exempts de licence.
L'exploitation est autorisée aux deux conditions suivantes:
(1) l'appareil ne doit pas produire de brouillage, et
(2) l'utilisateur de l'appareil doit accepter tout brouillage radioélectrique subi, même si le brouillage est susceptible d'en compromettre le fonctionnement.
ISEDC Radiation Exposure Statement:
This equipment complies with ISEDC RF radiation exposure limits set forth for an uncontrolled environment. This transmitter must not be co-located or operating in conjunction with any other antenna or transmitter.
Cet appareil est conforme aux limitesd'exposition de rayonnement RF ISEDC établiespour un environnement non contrôlé.
Cetémetteur ne doit pas être co-implanté oufonctionner en conjonction avec toute autreantenne ou transmetteur.
Any Changes or modifications not expressly approved by the party responsible for compliance could void the user’s authority to operate the equipment.
Warranty / Garantie / Garantie / Garanzia / Garantía / Garantie / Garantia / Гарантия / Гарантія
EN 300 440 V2.1.1(2017-03)
EN 300 328 V2.1.1(2016-11)
EN 301 489-1 V2.2.0(2017-03)
EN 301 489-3 V2.1.1(2017-03)
EN 301 489-17 V3.2.0(2017-03)
www.rapoo.com
The device is provided with two-year limited hardware warranty from the purchase day. Please see www.rapoo.com for more information.
L'appareil est fourni avec deux ans de garantie matérielle limitée à compter du jour d'achat. Merci de consulter www.rapoo.com pour plus d'informations.
Wir gewähren eine zweijährige, eingeschränkte Hardware-Garantie ab Kaufdatum. Weitere Informationen finden Sie hier: www.rapoo.com.
il dispositivo viene fornito con due anni di garanzia hardware limitata a parite dalla data di acquisto. Per ulteriori informazioni consultare www.rapoo.com.
El dispositivo se proporciona con una garantía de hardware limitada de dos años a partir de la fecha de compra. Consulte la dirección www.rapoo.com para obtener más información.
Het toestel wordt met een tweejarige beperkte hardware-garantie vanaf de aankoopdatum geleverd. Raadpleeg www.rapoo.com voor meer informatie.
O dispositivo é fornecido com garantia de hardware limitada de dois anos a partir do dia da compra. Por favor consulte www.rapoo.com para obter mais informações.
Данное устройство предоставляется с ограниченной гарантией на аппаратное обеспечение сроком два года со дня покупки. Более подробную информацию можно найти по адресу www.rapoo.com.
Строк дії обмеженої гарантії для апаратного забезпечення - два роки з дати придбання. Більше інформації ви знайдете на www.rapoo.com.
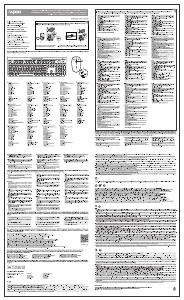
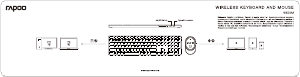
Status LED / LED de statut / Status-LED / LED di stato / LED de estado / Status-LED / LED de estado / Светодиодный индикатор состояния / Світлодіод статусу
System Requirements / Exigences du système / Systemvoraussetzungen / Requisiti di sistema / Requerimientos del sistema / Systeemvereisten /
Requisitos do Sistema / Системные требования / Системні вимоги
Mouse Souris Maus
Ratón Muis
Rato Мышь Миша
Windows
®
XP / Vista / 7 / 8 / 10 or later, USB port
Windows
®
XP / Vista / 7 / 8 / 10 o versioni successive, Porta USB
Windows
®
XP / Vista / 7 / 8 / 10 ou mais recente, porta USB
Windows
®
XP / Vista / 7 / 8 / 10 ou version ultérieure, Port USB
Windows
®
XP / Vista / 7 / 8 / 10 o posterior, Puerto USB
Windows
®
XP / Vista / 7 / 8 / 10 или более поздней версии, USB порт
Windows
®
XP / Vista / 7 / 8 / 10 oder höher, USB-Anschluss
Windows
®
XP / Vista / 7 / 8 / 10 of later, USB-poort
Windows
®
XP / Vista / 7 / 8 / 10 або вище, порт USB
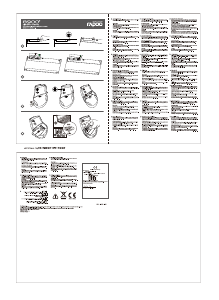
Mouse
Quando si rileva il mouse,se la spia rossa diventa fissa per 6 secondi, il dispositivo Bluetooth 1
è associato. Se la spia rossa lampeggia lentamente, il dispositivo Bluetooth 2 è associato. Se la
spia è spenta, il dispositivo a 2,4 GHz è associato.
Quando pegar no rato,se a luz vermelha ficar estática durante 6 segundos, significa que
o dispositivo Bluetooth 1 está emparelhado. Se a luz vermelha piscar lentamente,
significa que o dispositivo Bluetooth 2 está emparelhado. Se a luz estiver apagada,
significa que o dispositivo de 2,4 GHz está emparelhado.
When you pick up the mouse, if the red light turns stable for 6 seconds, Bluetooth device 1
is paired. If the red light flashes slowly , Bluetooth device 2 is paired. If the light is off, the
2.4 GHz device is paired.
Lorsque vous prenez la souris,si l'indicateur lumineux rouge devient fixe pendant 6
secondes, l'appareil Bluetooth 1 est appairé. Si l'indicateur lumineux rouge clignote
lentement, l'appareil Bluetooth 2 est appairé. Si l'indicateur lumineux est éteint,
l'appareil 2,4 GHz est appairé.
Cuando levante el ratón,si la luz roja se ilumina permanentemente durante 6 segundos,
el dispositivo 1 Bluetooth está asociado. Si la luz roja parpadea lentamente, el dispositivo
2 Bluetooth está asociado. Si la luz está apagada, está asociado el dispositivo de 2,4 GHz.
При выборе мыши,Если красный индикатор постоянно горит в течение 6 секунд,
по Bluetooth сопряжено устройство 1. Если красный индикатор медленно мигает,
по Bluetooth сопряжено устройство 2. Если индикатор выключится, установлено
сопряжение с устройством 2,4 ГГц.
Wenn Sie die Maus anheben,wenn die rote Leuchte 6 Sekunden lang dauerhaft leuchtet, ist
Bluetooth-Gerät 1 gekoppelt. Wenn die rote Leuchte langsam blinkt, ist Bluetooth-Gerät 2
gekoppelt. Wenn die Leuchte nicht leuchtet, ist das 2,4-GHz-Gerät gekoppelt.
Wanneer u de muis opraapt,als het rode lampje gedurende 6 seconden stabiel oplicht, is
Bluetooth-apparaat 1 gekoppeld. Als het rode lampje langzaam knippert, is Bluetooth-appa-
raat 2 gekoppeld. Als het lampje uit is, is het 2,4 GHz apparaat gekoppeld.
Коли ви вибираєте мишу,Якщо через 6 секунд червона лампочка починає неперервно
світитися, значить, пристрій Bluetooth 1 поєднано в пару. Якщо червона лампочка
повільно спалахує, пристрій Bluetooth 2 поєднано в пару. Якщо лампочка вимкнулася,
значить, поєднано в пару пристрій 2,4 ГГц.
Premere la combinazione dei tasti della tastiera, Fn+1, Fn+2, Fn+3 e Fn+4 per passare tra
i dispositivi associati.
Premere il tasto Bluetooth del mouse per passare tra i dispositivi associati.
La tastiera e il mouse connettono un dispositivo tramite il ricevitore a 2,4 GHz. Rispettivamente,
associano 3 e 2 dispositivi tramite Bluetooth.
Pressione as combinações de teclas do teclado, Fn+1, Fn+2, Fn+3 e Fn+4 para alternar entre
dispositivos emparelhados.
Pressione o botão de Bluetooth do rato para alternar entre dispositivos emparelhados.
O teclado e o rato ligam a um dispositivo através de um recetor de 2,4 GHz. Podem ser
emparelhados respetivamente com 3 e 2 dispositivos através de Bluetooth.
Press key combinations of the keyboard, Fn+1, Fn+2, Fn+3 and Fn+4 to switch among
paired devices.
Press Bluetooth button of the mouse to switch among paired devices.
The keyboard and the mouse connect a device via 2.4 GHz receiver. They respectively
pair 3 and 2 devices via Bluetooth.
Appuyez sur les combinaisons de touches du clavier, Fn+1, Fn+2, Fn+3 et Fn+4 pour basculer
parmi les appareils appairés.
Appuyez sur le bouton Bluetooth de la souris pour basculer parmi les appareils appairés.
Le clavier et la souris connectent un appareil via un récepteur 2,4 GHz. Ils appairent
respectivement 3 et 2 appareils via Bluetooth. "
Presione las combinaciones de tecla del teclado Fn+1, Fn+2, Fn+3 y Fn+4 para cambiar entre
los dispositivos asociados.
Presione el botón Bluetooth del ratón para cambiar entre los dispositivos asociados.
El teclado y el ratón se conectan a un dispositivo a través de un receptor de 2,4 GHz. Se
asocian a 3 y 2 dispositivos, respectivamente, a través Bluetooth.
Нажмите одновременно кнопки Fn+1, Fn+2, Fn+3 и Fn+4 для переключения между
сопряженными устройствами.
Нажмите кнопку Bluetooth на мыши для переключения между сопряженными
устройствами.
Клавиатура и мышь подключены к устройству с помощью приемника 2,4 Гц. Они
соответственно выполняют сопряжение 3 и 2 устройств по Bluetooth.
Drücken Sie zum Umschalten zwischen gekoppelten Geräten die Tastenkombinationen
der Tastatur, Fn+1, Fn+2, Fn+3 oder Fn+4.
Drücken Sie zum Umschalten zwischen den gekoppelten Geräten die Bluetooth-Taste der Maus.
Tastatur und Maus stellen über einen 2,4-GHz-Empfänger eine Verbindung zu einem
Gerät her. Sie koppeln entsprechend 3 und 2 Geräte per Bluetooth.
Druk op de sneltoetsen van het toetsenbord, Fn+1, Fn+2, Fn+3 en Fn+4 om te schakelen
tussen gekoppelde apparaten.
Druk op de Bluetooth-knop van de muis om te schakelen tussen gekoppelde apparaten.
Het toetsenbord en de muis verbinden een apparaat via een 2,4 GHz ontvanger. Ze koppelen
respectievelijk 3 en 2 apparaten via Bluetooth.
Натискайте комбінації клавіш Fn+1, Fn+2, Fn+3 і Fn+4, щоб перемикатися між поєднаними
у пару пристроями.
Натисніть кнопку Bluetooth на миші, щоб перемикатися між поєднаними у пару пристроями.
Клавіатура і миша підключаються до пристрою через приймач 2,4 ГГц. Вони поєднуються
у пару по Bluetooth, відповідно, з 3 і 2 пристроями.
When you use the mouse, if status LED flashes twice every two seconds, it means the battery power is low.
Lorsque vous utilisez la souris, si la LED de statut clignote deux fois toutes les deux secondes, cela signifie que le niveau de la pile est faible.
Wenn Sie die Maus nutzen und die Status-LED zweimal alle zwei Sekunden blinkt, deutet dies auf einen geringen Batteriestand hin.
Quando si usa il mouse, se il LED di stato lampeggia due volte ogni due secondi, significa che la batteria è scarica.
Cuando utilice el ratón, si el LED de estado parpadea dos veces cada dos segundos, significa que la pila tiene poca carga.
Wanneer u de muis gebruikt, en het statuslampje elke twee seconden twee keer knippert, betekent dit dat het batterijvermogen laag is.
Durante a utilização do rato, se o LED de estado piscar duas vezes a cada dois segundos, significa que a bateria está fraca.
При использовании мыши, если светодиод вспыхивает дважды каждые две секунды, это указывает на низкий уровень заряда батареи.
Під час користування мишею мерехтіння світлодіода статусу двічі кожні дві секунди означає низький заряд батареї.

Tham gia cuộc trò chuyện về sản phẩm này
Tại đây bạn có thể chia sẻ suy nghĩ của mình về Rapoo 9000M Bàn phím. Nếu bạn có thắc mắc, trước tiên hãy đọc kỹ hướng dẫn. Yêu cầu một hướng dẫn có thể được thực hiện bằng cách sử dụng mẫu liên hệ của chúng tôi.
trả lời | Nội dung này rất hữu ích (0) (Dịch bằng Google)