Specications are subject to change without notice
© 2015 Koninklijke Philips N.V.
All rights reserved.
HD4911
www.philips.com/welcome
ZH-HK
VI
使用手冊
Hướng dẫn sử dụng
EN
TH
MS-MY
User manual
คู่มือผู้ใช้
Manual pengguna
www.philips.com/welcome
User manual
HD4911
www.philips.com/welcome
Safety leaflet
HD4911
www.philips.com/welcome
Warranty
HD4911
10cm
10cm
Preset/Timer
On/O
Menu
Preset Timer
Increase
Decrease
Fry
Menu Decrease Preset/Timer
Preset Timer
Increase On/O
Hot pot Water Steam/Stew Roast
c
e
a
b
d
f
g h i j k ml
u t s r q p
o n
On/O
On/O
Menu
Increase
Decrease
Preparing for use
Overview
概覽
Tổng quan
ภาพรวม
Gambaran keseluruhan
準備使用
Chuẩn bị sử dụng máy
การเตรียมตัวกอนใชงาน
Bersedia untuk menggunakan
使用電磁爐
Sử dụng bếp từ
การใชเตาแมเหล็กไฟฟ
Menggunakan periuk aruhan
Using the induction cooker
Using the timer
使用定時功能
Sử dụng chức năng hẹn giờ
เวลาในการปรุงอาหารและระดับกำลังไฟเริ่มตน
Menggunakan periuk aruhan
Preset/Timer
On/O
Menu
Preset Timer
Increase
Decrease
Preset time for
delayed cooking
預設時間延時烹飪
Menggunakan pemasa
การใชปุ่มตั้งเวลา
Masa dipraset bagi
masakan tertangguh
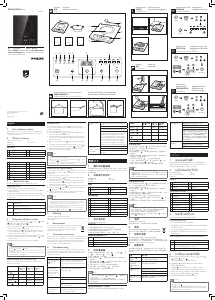
Recommended types and sizes of cookware
建議的廚具種類和大小
Các loại và kích cỡ dụng cụ nấu khuyên dùng
ชนิดและขนาดของภาชนะประกอบอาหารที่แนะนำ
Jenis dan saiz alat memasak yang disarankan
Cleaning
清潔
Vệ sinh máy
การทำความสะอาด
Pembersihan
English
1 Your induction cooker
Congratulations on your purchase and welcome to Philips! To fully
benet from the support that Philips offers, register your product at
www.philips.com/welcome.
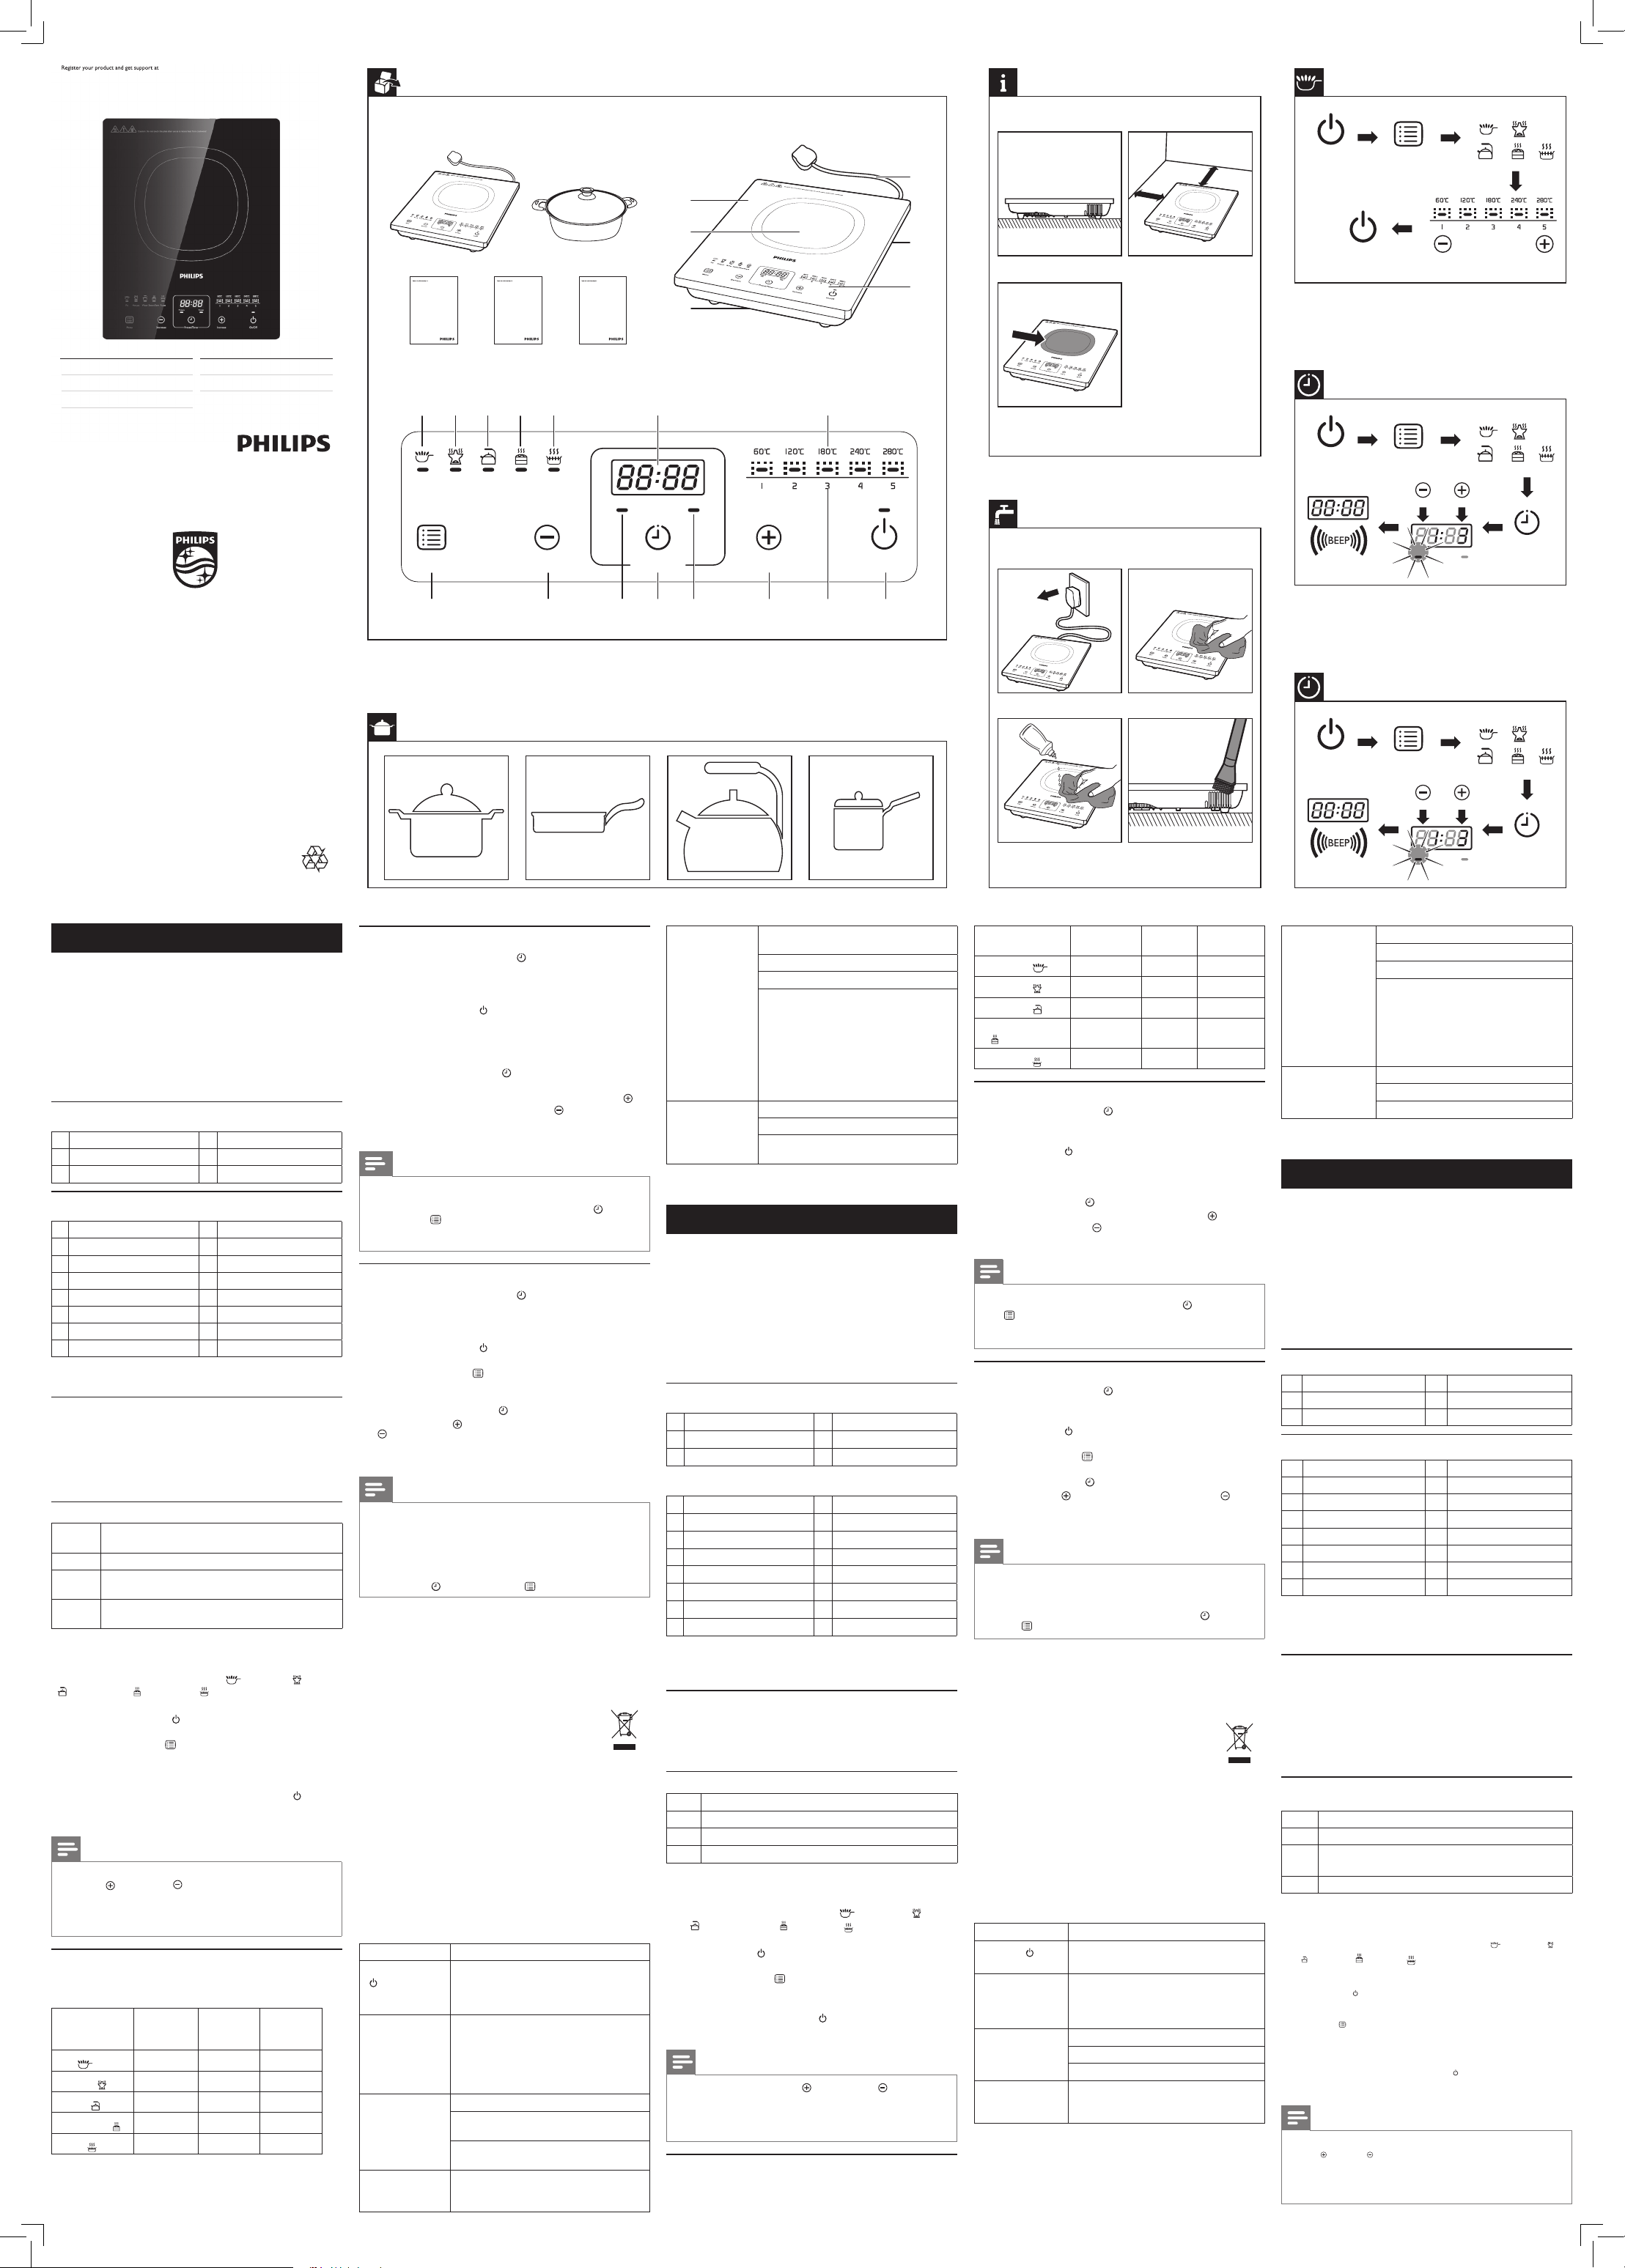
2 What’s in the box
Induction cooker main unit Pot
Safety leaet User manual
Warranty card
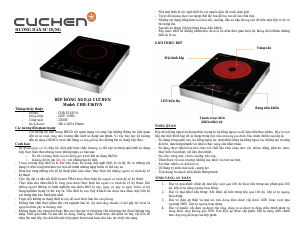
Overview
a
Crystalite cooking plate
d
Control panel
b
Cooking zone
e
Air outlets
c
Air inlet
f
Power cord
Controls overview
g
Fry mode
o
Power levels
h
Hot pot mode
p
Increase button
i
Water mode
q
Timer function
j
Steam/Stew mode
r
Preset/Timer button
k
Roast mode
s
Preset function
l
Display
t
Decrease button
m
Cooking temperatures
u
Menu button
n
On/Off button
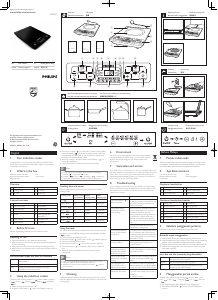
3 Before first use
Remove all packaging material from the induction cooker.
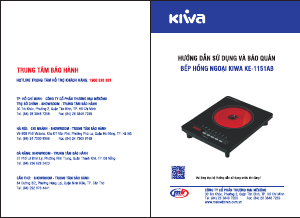
Preparing for use
1 Place the appliance on a dry, stable and level surface.
2 Make sure there is at least 10cm free space around the appliance to
prevent overheating.
3 Always place the cookware on the cooking zone during cooking.
4 Make sure you use cookware of the correct types and sizes (see the
table below).
Recommended types and sizes of cookware
Material Cookware with a bottom made of iron or magnetic
stainless steel
Shape Cookware with a at bottom
Size Cookware with a bottom diameter of 10-23cm,
depending on the cooking mode
Weight Cookware with a weight of up to 15kg (including
contents)
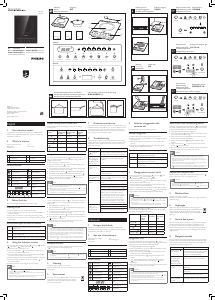
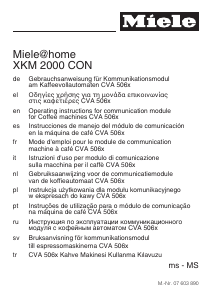
4 Using the induction cooker
There are ve preset cooking modes: Fry ( ), Hot pot ( ), Water
(
), Steam/Stew ( ), and Roast ( ).
1 Follow the steps in “Preparing for use”.
2 Press the On/Off button (
), the On/Off indicator lights up. The
induction cooker enters standby mode.
3 Press the Menu button (
) repeatedly until the desired cooking
mode is selected. The corresponding indicator lights up and the
induction cooker starts working.
4 Default cooking time, power, and power level are displayed on the screen.
5 When the cooking is nished, press the On/Off button (
) to turn
off the appliance.
6 Unplug the induction cooker after the fan stops working.
Note
•
During cooking, you can change the power level from 1 to 5 by pressing the
Increase (
) or Decrease ( ) button.
• At Water mode, the induction cooker automatically turns off after the water
is boiled for 3 minutes.
• At Steam/Stew mode, the induction cooker automatically adjusts the cooking
temperature for better cooking result.
Default cooking time and power level
Refer to below table for default cooking time and power levels of
different cooking modes.
Cooking mode Default
cooking time
(minute)
Default
power level/
Power
Power
adjusting
range
Fry (
)
120 2/800W 400-800W
Hot pot (
)
120 5/2100W 400-2100W
Water (
)
20 4/1600W 400-2100W
Steam/Stew (
)
60 4/1600W 400-2100W
Roast (
)
120 2/800W 400-800W
E7 displays on the
screen.
Check if the appliance has been operating for
2 hours.
Check if the air outlets are blocked.
Check if the ambient temperature is too high.
When the error code displays on the screen,
the appliance stops heating automatically. If the
appliance resumes working after it drops to
room temperature, the error code is caused
by the overheating protection of the appliance.
If the error persists and you cannot resolve
it, do not repair or disassemble the appliance
by yourself. Take the appliance to your Philips
dealer or a service center authorised by Philips.
The induction
cooker stops
working or turns off
automatically.
The induction cooker has been idle for 2 hours.
Check if the air inlet and outlets are covered.
Temperature around the induction cooker is
too high.
繁體中文
1
屬於您的電磁爐
恭喜您購買
Philips
產品,歡迎來到
Philips
世界!
要享受
Philips
為您提供的全面支援,請在以下網站
www.philips.com/welcome
註冊您的產品。
2
包裝盒內含物件
電磁爐主裝置
鍋子
安全單張
用戶手冊
保用證
概覽
a
微晶玻璃電磁爐板面
d
控制板面
b
烹飪區
e
排氣口
c
進氣口
f
電源線
控制鍵概覽
g
煎炒模式
o
火力等級
h
火鍋模式
p
增加按鈕
i
煮水模式
q
定時功能
j
蒸煮
/
悶燉模式
r
預設
/
定時按鈕
k
烘烤模式
s
預設功能
l
顯示幕
t
減少按鈕
m
烹飪溫度
u
功能表按鈕
n
開
/
關按鈕
3
首次使用前
拆去電磁爐上的所有包裝材料。
準備使用
1 將電磁爐放置於穩固、平坦的水平表面上。
2 確保機器周圍
10
公分內沒有其他物體,以防機器過熱。
3 烹飪時請將廚具放置在烹飪區內。
4 確保您使用的廚具種類和大小正確。(請見下表)
建議的廚具種類和大小
材質 底部使用鐵或電磁不鏽鋼製做的廚具
外形 有平底的廚具
大小 底部直徑介於
10
至
23
公分的廚具,依烹飪模式而定
重量 至多重
15
公斤的廚具(包括內容物)
4
使用電磁爐
本機器共有
5
種預設烹飪模式:煎炒(
)、火鍋(
)、煮
水(
)、蒸煮
/
悶燉( )、烘烤( )。
1 遵照「準備使用」裡的步驟。
2 按下開
/
關按鈕(
),開
/
關指示燈便會亮起。
電磁爐進入
備用模式。
3 重複按功能表按鈕(
),選擇您想使用的烹飪模式。
對應
的指示燈會亮起,電磁爐開始運作。
4 預設烹飪時間、火力及火力等級會顯示在熒幕上。
5 烹飪完畢後,按下開
/
關按鈕(
),關閉本產品。
6 等風扇停止運轉後,拔除電磁爐的插頭。
提示
• 烹飪時,您可以按增加按鈕(
)或減少按鈕(
),選擇
1
至
5
級的火力等級。
• 使用煮水模式時,水滾
3
分鐘後電磁爐會自動關閉。
• 使用蒸煮
/
悶燉模式時,電磁爐會自動調整烹飪溫度,讓烹飪出來的
食品更加美味。
預設烹飪時間和火力等級
請參照下表,參考不同烹飪模式的預設烹飪時間和火力等級。
螢幕上顯示
E7
。 請檢查產品是否已經使用
2
小時。
請檢查排氣口是否被阻塞。
請檢查附近環境溫度是否太高。
如螢幕顯示此錯誤代碼,產品會自動停止
加熱。
如果產品的溫度降至室溫後,產品
恢復工作,代表是產品的防止過熱功能導
致錯誤代碼出現。
如果錯誤繼續出現,
而且無法解決,請不要自行維修或拆卸產
品。
請將產品拿至飛利浦經銷商或飛利浦
認可的服務中心。
電磁爐停止運轉或
自動關閉。
電磁爐閒置
2
小時未使用。
檢查進氣口或排氣口是否被遮蓋住。
電磁爐周圍的溫度過高。
ภาษาไทย
1 เตาแมเหล็กไฟฟา
ขอแสดงความยินดีที่คุณเลือกซื้อผลิตภัณฑของเรา และยินดีตอนรับส Philips
เพื่อใหคุณไดรับประโยชนอยางเต็มที่จากบริการที่ Philips มอบให โปรดลง
ทะเบียนผลิตภัณฑของคุณที่ www.philips.com/welcome
2 ภายในกลองมีอะไรบาง
เครื่องเตาแมเหล็กไฟฟา หมอ
เอกสารเกี่ยวกับความปลอดภัย คมือผใช
ใบรับประกัน
ภาพรวม
a
หนาสัมผัสคริสตัลไลท
d
ปุ่มควบคุม
b
พื้นที่สำาหรับวางภาชนะ
e
ทางลมออก
c
ทางลมเขา
f
สายไฟ
ภาพรวมของการควบคุม
g
โหมดผัด
o
ปุ่มเปด/ปด
h
โหมดหมอไฟ
p
ปุ่มเพิ่ม
i
โหมดน
q
ฟงกชั่นตั้งเวลา
j
โหมดตน/สตูว
r
ปุ่มตั้งคาลวงหนา/ตั้งเวลา
k
โหมดคั่ว
s
ฟงกชันตั้งคาลวงหนา
l
หนาจอแสดงผล
t
ปุ่มลด
m
อุณหภูมิการทำาอาหาร
u
ปุ่มเมนู
n
ปุ่มเปด/ปด
3 กอนใชงานครั้งแรก
แกะวัสดุบรรจุภัณฑที่หอเตาแมเหล็กไฟฟาออกทั้งหมด
การเตรียมตัวกอนใชงาน
1 ควรวางเตาบนพื้นผิวที่แหง มั่นคง และเสมอกัน
2 ตรวจดูใหแนใจวาบริเวณโดยรอบเครื่องมีพื้นที่วางอยางนอย 10 ซม. เพื่อปอง
กันไมใหเตารอนเกินไป
3 วางภาชนะประกอบอาหารบนพื้นที่สำาหรับวางภาชนะในระหวางประกอบอาหาร
4 ตรวจดูใหแนใจวาคุณไดใชภาชนะประกอบอาหารถูกประเภทและขนาด (ดู
ที่ตารางดานลาง)
ชนิดและขนาดของภาชนะประกอบอาหารที่แนะนำา
วัสดุ ภาชนะประกอบอาหารที่มีกนภาชนะทำาดวยเหล็ก หรือสแตนเลสสตีล
รูปทรง ภาชนะประกอบอาหารที่มีกนภาชนะแบนเรียบ
ขนาด ภาชนะประกอบอาหารที่มีขนาดเสนผานศูนยกลางใตภาชนะขนาด
10-23 ซม. ขึ้นอยกับโหมดการประกอบอาหาร
นหนัก ภาชนะประกอบอาหารที่มีนหนักไมเกิน 15 กิโลกรัม (รวมอาหารในภาชนะ)
4 การใชเตาแมเหล็กไฟฟา
มีโหมดประกอบอาหารแบบตั้งคาลวงหนา 5 โหมด: ทอด ( ), หมอไฟ ( ),
น (
), ตน/สตูว ( ) และคั่ว ( )
1 ทำาตามขั้นตอนตอไปนี้ใน “การเตรียมตัวกอนใชงาน”
2 กดปุ่มเปด/ปด (
) สัญญาณไฟ เปด/ปด จะสวางขึ้น เตาแมเหล็ก
ไฟฟาเขาสโหมดสแตนดบาย
3 กดปุ่มเมนู (
) ซจนกวาโหมดการปรุงอาหารที่ตองการจะถูกเลือก
สัญญาณไฟที่เกี่ยวของจะสวางขึ้นและเตาแมเหล็กไฟฟาจะเริ่มทำางาน
4 เวลาในการประกอบอาหาร กำาลังไฟ และระดับกำาลังไฟจะแสดงบนหนาจอ
5 เมื่อประกอบอาหารเสร็จ ใหกดปุ่มเปด/ปด (
) เพื่อปดเตา
6 ถอดปลั๊กเตาแมเหล็กไฟฟาหลังจากที่พัดลมหยุดทำางาน
หมายเหตุ
• ระหวางประกอบอาหาร คุณสามารถเปลี่ยนระดับกำาลังไฟจาก 1 ถึง 5 โดยการกดปุ่ม
เพิ่ม (
) หรือ ลด ( )
• ในโหมดน เตาแมเหล็กไฟฟาจะปดโดยอัตโนมัติหลังจากที่นเดือดเปนเวลา 3 นาที
• ในโหมดตน/สตูว เตาแมเหล็กไฟฟาจะปรับอุณหภูมิการประกอบอาหารโดยอัตโนมัติ
เมื่อใหไดผลลัพธการประกอบอาหารที่ดีที่สุด
Using the timer
You can use the Preset/Timer button ( ) to decide how much
time you want the appliance to work at different cooking modes (not
available at Water mode).
1 Follow the steps in “Preparing for use”.
2 Press the On/Off button (
), the On/Off indicator lights up. The
induction cooker enters standby mode.
3 Press the Menu button repeatedly until the desired cooking mode
is selected. The corresponding indicator lights up and the induction
cooker starts working.
4 Press the Preset/Timer button (
) until the timer indicator lights
up.
5 “0:00” blinks on the display screen. Press the Increase button (
)
to set the minute and the Decrease button (
) to set the hour.
6 When the time has elapsed, you will hear a few beeps and the
induction cooker turns off automatically.
Note
•
After you have selected the cooking time, wait for a few seconds before the
induction cooker automatically conrms it.
• After the timer is set, you can press the Preset/Timer button ( ) or the
Menu button (
) to cancel the timer.
• You will not be able to preset time for delayed cooking after the timer is set.
In order to do so, you will need to cancel the timer rst.
Preset time for delayed cooking
You can use the Preset/Timer button ( ) to set the time at which you
want the appliance to start cooking (not available at Fry, Roast and Hot
pot modes.).
1 Follow the steps in “Preparing to use”.
2 Press the On/Off button (
), the On/Off indicator lights up. The
induction cooker enters standby mode.
3 Press the Menu button (
) repeatedly until the desired cooking
mode is selected. The corresponding indicator lights up and the
induction cooker starts working.
4 Press the Preset/Timer button (
) until the preset indicator lights up.
5 Press the Increase (
) button to set the minute and the Decrease
(
) button to set the hour.
6 When the preset time has elapsed, you will hear a few beeps and
the induction cooker starts working automatically.
Note
•
At Steam/Stew mode, the induction cooker automatically enters Timer mode
after the preset time is selected. You can then decide how much time you
want the induction cooker to work when the preset time has elapsed. Refer
to "Using the timer" chapter on how to set the cooking time.
• After you have selected the preset time, wait for a few seconds before the
induction cooker automatically conrms it.
• When the induction cooker is at preset mode, you can press the Preset/
Timer button (
) or the Menu button ( ) to cancel the preset time.
5 Cleaning
Unplug the appliance and let it cool down.
Clean the appliance with a damp cloth and, if necessary, with some mild
cleaning agent.
6 Environment
Do not throw away the appliance with the normal household
waste at the end of its life, but hand it in at an ofcial
collection point for recycling. By doing this, you help to
preserve the environment.
7 Guarantee and service
If you need service or information or if you have a problem, please visit
the Philips website at www.philips.com or contact the Philips Consumer
Care Centre in your country (you will nd its phone number in the
worldwide guarantee leaet). If there is no Consumer Care Centre in
your country, go to your local Philips dealer.
8 Troubleshooting
If your induction cooker does not function properly or if the cooking
quality is insufcient, consult the table below. If you are unable to solve
the problem, contact a Philips service centre or the Consumer Care
Centre in your country.
Problem Solution
The On/Off button
(
) does not
respond
There is a connection problem. Check if the
induction cooker is connected to the mains
and if the plug is inserted rmly into the wall
socket
When I press one
of the cooking
mode buttons, the
light of the selected
mode does not
go on.
The light is defective. Take the appliance
to your Philips dealer or a service centre
authorised by Philips.
E5 or E6 displays on
the screen
Check if the voltage is too low or too high.
Check if the power cord or power socket is
too hot.
Check if the too many appliances are plugged
to the same connector.
E0, E1, E2, E3, E4, E8
or Ed displays on
the screen.
The induction cooker has malfunctions. Take
the appliance to a Philips dealer or a service
centre authorised by Philips.
烹飪模式
預設烹飪時間
(分鐘)
預設火力
等級
/
火力
功率調整
範圍
煎炒模式(
)
120 2/800
瓦
400-800
瓦
火鍋模式(
)
120 5/2100
瓦
400-2100
瓦
煮水模式(
)
20 4/1600
瓦
400-2100
瓦
蒸煮
/
悶燉模式
(
)
60 4/1600
瓦
400-2100
瓦
烘烤模式(
)
120 2/800
瓦
400-800
瓦
使用定時功能
您可以使用預設
/
定時按鈕(
)來選擇不同烹飪模式下您想使
用產品的時間。(煮水模式下無法使用此功能。)
1 遵照「準備使用」裡的步驟。
2 按下開
/
關按鈕(
),開
/
關指示燈便會亮起。
電磁爐進入
備用模式。
3 重複按功能表按鈕,選擇您想使用的烹飪模式。
對應的指示
燈會亮起,電磁爐開始運作。
4 按下預設
/
定時按鈕(
),直到定時指示燈亮起。
5 「
0:00
」會在顯示熒幕上閃爍。
按下增加按鈕(
)設定分
鐘數,按下減少按鈕(
)
設定時數。
6 設定時間到時,您會聽到幾下嗶聲,電磁爐會自動關閉。
提示
• 選好烹飪時間後,靜候數秒,電磁爐將會自動確認。
• 定時功能設定好後,您可以按下預設
/
定時按鈕(
)或功能表按鈕
(
)取消定時。
• 定時功能設定好後,您無法預設時間延時烹飪。
若您想預設時間延
時烹飪,您必須先取消定時功能。
預設時間延時烹飪
您可以利用預設
/
定時按鈕(
)設定您想讓機器開始烹飪的時
間。(此功能不適用於煎炒、烘烤及火鍋模式)
1 遵照「準備使用」裡的步驟。
2 按下開
/
關按鈕(
),開
/
關指示燈便會亮起。
電磁爐進入
備用模式。
3 重複按功能表按鈕(
),選擇您想使用的烹飪模式。
對應
的指示燈會亮起,電磁爐開始運作。
4 按下預設
/
定時按鈕(
),直到預設指示燈亮起。
5 按下增加按鈕(
)設定分鐘數,按下減少按鈕(
)
設
定時數。
6 預設時間到時,您會聽到幾下嗶聲,電磁爐會自動開始運作。
提示
• 蒸煮
/
悶燉模式下,電磁爐會在預設時間設定完成後,自動進入定時
模式。
預設時間到時,您可以設定您想讓電磁爐運作的時間長度。
請參考「使用定時功能」章節,了解如何設定烹飪時間。
• 選好預設時間後,靜候數秒,電磁爐將會自動確認。
• 電磁爐在預設模式下時,您可以按下預設
/
定時按鈕(
)或功能表
按鈕(
)取消預設時間。
5
清潔
拔除產品插頭,讓產品冷卻。
用濕布清潔本產品,必要時請使用溫和的清潔劑。
6
環境
請勿在本產品使用壽命結束後當作一般家庭垃圾廢棄,
應交給官方回收站作循環再用。
這樣做有助保護環境。
7
保障及服務
如果您需要資料或有疑問,請前往
Philips
網站
www.philips.com
,或聯絡您的國家的
Philips
顧客服務中心(您
會在全球保障小冊子上找到其電話號碼)。
如果您的國家沒有顧
客服務中心,請前往當地的
Philips
經銷商。
8
疑難排解
若電磁爐無法正確運作,或電磁爐烹飪效率不佳,請參照下表。
若您無法解決問題,請聯絡飛利浦服務中心或您所在國家的顧客
服務中心。
問題 解決方案
開
/
關按鈕
沒
有響應
連接有誤。
檢查電磁爐是否有連接主電
源,插頭和插座是否有鬆脫。
按下其中一個烹飪
模式按鈕後,已
選模式的燈沒有
亮起。
指示燈損壞。
請將產品拿至飛利浦經銷商
或飛利浦認可的服務中心。
熒幕上顯示
E5
或
E6
檢查電壓是否太低或太高。
檢查電源線或電源插座是否過熱。
檢查同一連接器上是否連接太多插頭。
熒幕上顯示
E0
、
E1
、
E2
、
E3
、
E4
、
E8
或
Ed
。
電磁爐故障。
將產品送至飛利浦經銷商或
飛利浦認可的服務中心。
HD4911_UM_v3.0


Tham gia cuộc trò chuyện về sản phẩm này
Tại đây bạn có thể chia sẻ suy nghĩ của mình về Philips HD4911 Tarô. Nếu bạn có thắc mắc, trước tiên hãy đọc kỹ hướng dẫn. Yêu cầu một hướng dẫn có thể được thực hiện bằng cách sử dụng mẫu liên hệ của chúng tôi.